On this page
- Fill the form online
- What is the Self Declaration Form and Why It Replaced Affidavits
- Which Certificates Require This Form
- Every Field on the Form — What to Write
- How to Scan and Upload Correctly
- 7 Mistakes That Cause Rejection — And How to Avoid Each
- Using the Form for Each Certificate Type
- Can You Fill the Form Digitally Instead of by Hand?
- Frequently Asked Questions
- Quick Reference Table
What is the Self Declaration Form and Why It Replaced Affidavits
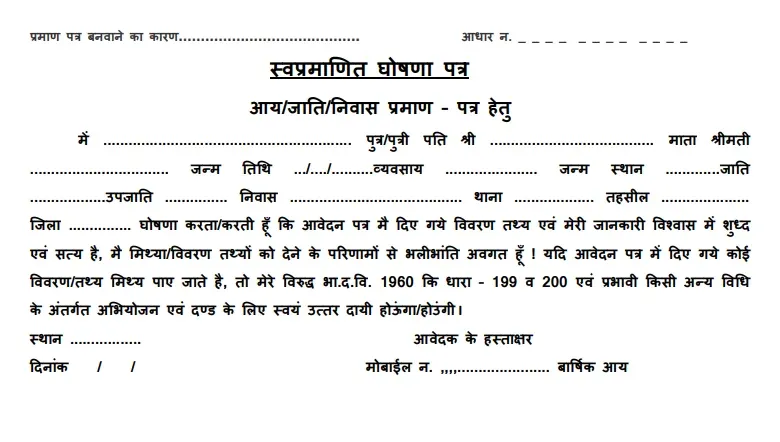
The self declaration form (स्व-प्रमाणित घोषणा पत्र / Swa Pramanit Ghoshna Patra) is a mandatory document for applying on the eDistrict UP portal. You upload it when applying for an income certificate, caste certificate, or domicile certificate through eSathi. One single form works for all three — separate forms are not needed. In this form, you declare under your own signature that every detail in your application is true, correct, and complete.
This form replaced a system that cost Indian citizens an estimated ₹8,000 crore every year (source: Centre for Civil Society, 2015, cited in the DoPT letter to ministries). Before this change, even a simple income certificate application required ₹10–100 worth of stamp paper, a typed affidavit from a document writer outside the court, and a notary's stamp and signature. The affidavit added cost but zero verification value — the notary stamped without checking anything, and the Tehsildar still conducted independent field verification.
How the Change Happened
The Department of Administrative Reforms and Public Grievances (DARPG) initiated the shift in 2014. They studied the Punjab model, where affidavits constituted 65% of all 2.2 million services delivered at district centres. After Punjab replaced affidavits with self-declarations, affidavit-related requests dropped to just 9.8% within two years (source: DARPG reform document, Hindustan Times report, August 2014).
Union Minister Jitendra Singh formally announced the policy in 2014, calling it the first time since independence that attestation by gazetted officers would be done away with. DARPG issued guidelines to all central ministries and state governments, with a target of full implementation by December 2014. States adopted it at different speeds — UP implemented it through the eDistrict portal where the self-declaration form is now a required upload for all revenue certificate applications.
Legal Weight — Not Casual, Not Optional
The removal of notary costs does not reduce legal accountability. The form's declaration text references the penal provisions on false declarations — Sections 199 and 200 of the Indian Penal Code, which the Bharatiya Nyaya Sanhita replaced with Sections 236 and 237 on 1 July 2024. Section 236 covers a false statement in a declaration that is by law receivable as evidence; Section 237 covers using such a declaration knowing it to be false. Both are punished as if the person had given false evidence, which carries up to seven years' imprisonment. If any information you declare is found false, the certificate gets cancelled and criminal proceedings can be initiated against you. "Self attestation also means self-incrimination" — this is how the Punjab government described it in their proposal to the Centre (source: DARPG reform document).
Which Certificates Require This Form
The self declaration form is mandatory for three certificate types on eDistrict UP:
Income Certificate (आय प्रमाण पत्र): You declare your family's total annual income from all sources — salary, pension, rent, agriculture, business, and other earnings. The Lekhpal verifies this against local records and community inquiry during field verification.
Caste Certificate (जाति प्रमाण पत्र): You declare your caste as listed in the official SC/ST/OBC schedule for Uttar Pradesh. The Lekhpal verifies through community inquiry, local leaders, and reference to existing family caste records.
Domicile Certificate (निवास प्रमाण पत्र): You declare your permanent residence in Uttar Pradesh. The Lekhpal visits your locality and confirms that you actually reside at the stated address.
Other eDistrict certificates (birth, death, haisiyat, character, EWS) have their own documentation requirements and do not use this specific form. The same single form covers income, caste, and domicile — in the "purpose" field, you write whichever certificate you are applying for.
Every Field on the Form — What to Write
The official form has 20 fields. Here is exactly what to write in each one, with specific guidance for income, caste, and domicile applications.
स्व-प्रमाणित घोषणा पत्र
- 1प्रमाण पत्र बनवाने का कारणआय प्रमाण पत्र
- 2आधार न.XXXX XXXX 4821
- 3मैं / आवेदक का नामराजेश कुमार वर्मा
- 4पुत्र/पुत्री/पति श्रीसुरेश कुमार वर्मा
- 5माता श्रीमतीसुनीता वर्मा
- 6जन्म तिथि15/08/1990
- 7व्यवसायनिजी नौकरी
- 8जन्म स्थानलखनऊ
- 9जाति(सरकारी सूची की वर्तनी)
- 10उपजाति—
- 11निवासमकान 12, गली 3, अमीनाबाद
- 12थानाअमीनाबाद
- 13तहसीलसदर
- 14जिलालखनऊ
- 15बार्षिक आय240000
- 16घोषणा(पहले से छपा)
Identity Fields (Fields 1–7)
Field 1 — प्रमाण पत्र बनवाने का कारण (Purpose): Write the certificate name — "आय प्रमाण पत्र" for income, "जाति प्रमाण पत्र" for caste, or "निवास प्रमाण पत्र" for domicile. If you are applying for multiple certificates simultaneously, write all of them separated by a comma.
Fill in the form ↑Field 2 — आधार न. (Aadhaar Number): Write your 12-digit Aadhaar number carefully. The eSathi portal uses Aadhaar e-KYC to auto-fill your details — if the number on your form doesn't match the Aadhaar you used during eSathi registration, it creates a mismatch flag during verification.
Fill in the form ↑Field 3 — मैं / आवेदक का नाम (Applicant Name): Write your full name exactly as it appears on your Aadhaar card. This is the most common rejection trigger — even minor variations cause problems. If your Aadhaar says "राजेश कुमार वर्मा," do not write "राजेश वर्मा" or "आर.के. वर्मा" or "Rajesh Kumar Verma" in English. Match the Aadhaar exactly, character by character.
Fill in the form ↑Field 4 — पुत्र/पुत्री/पति श्री (Father's / Husband's Name): Write your father's full name. For married women applying under their husband's name, write the husband's name. Use the same name as entered in your eSathi application form — consistency across all three documents (Aadhaar, eSathi form, self-declaration) is critical.
Fill in the form ↑Field 5 — माता श्रीमती (Mother's Name): Write your mother's full name. This field is sometimes left blank by applicants who don't realise it's required. Fill it — an incomplete form can delay processing.
Fill in the form ↑Field 6 — जन्म तिथि (Date of Birth): Write in DD/MM/YYYY format. Must match your Aadhaar DOB. If your Aadhaar shows only a year (common for older Aadhaar cards), write 01/01/[year].
Fill in the form ↑Field 7 — व्यवसाय (Occupation): Write your current occupation — "सरकारी नौकरी" (government job), "निजी नौकरी" (private job), "व्यापार" (business), "कृषि" (farming), "छात्र" (student), "गृहिणी" (homemaker), or "बेरोज़गार" (unemployed). Be specific — don't leave it vague.
Fill in the form ↑Location Fields (Fields 8–14)
Field 8 — जन्म स्थान (Place of Birth): Write the city or village where you were born. For the domicile certificate, this is cross-checked against your claimed UP residence.
Fill in the form ↑Field 9 — जाति (Caste): Write your caste name exactly as it appears in the official UP SC/ST/OBC schedule. This field matters most for caste certificate applications. Even one letter of spelling variation between your form and the official government list can cause rejection. If you are applying for an income or domicile certificate and your caste is not relevant, still fill this field — leave it blank and the form looks incomplete.
Fill in the form ↑Field 10 — उपजाति (Sub-Caste): Optional. Write your sub-caste if applicable. Leave blank if not applicable — this is the one field that can remain empty without consequences.
Fill in the form ↑Field 11 — निवास (Residence): Write your complete residential address — house number, street/mohalla, village or ward name. This must match your Aadhaar address and your eSathi application address precisely.
Fill in the form ↑Field 12 — थाना (Police Station): Write the name of the police station under whose jurisdiction your address falls. Check your Aadhaar card, voter ID, or ration card for the correct police station name if you are unsure.
Fill in the form ↑Field 13 — तहसील (Tehsil): Write the tehsil name. This determines which Lekhpal and Tehsildar handle your application. Getting this wrong routes your application to the wrong jurisdiction, causing delays or rejection.
Fill in the form ↑Field 14 — जिला (District): Write your district name. Must match your eSathi application.
Fill in the form ↑Financial and Declaration Fields (Fields 15–20)
Field 15 — बार्षिक आय (Annual Income): Write your family's total annual income in numbers (e.g., "240000" for ₹2,40,000). This is especially critical for income certificates — the Lekhpal will verify this figure. For caste and domicile applications, this field still appears on the form; fill it accurately since the OBC Non-Creamy Layer threshold depends on income.
Fill in the form ↑Field 16 — घोषणा (Declaration Text): This is pre-printed on the form — you do not write it. It states that all information is true, that you understand the consequences of false information, and that you are liable for prosecution under the penal provisions on false declarations — IPC Sections 199 and 200, now Sections 236 and 237 of the Bharatiya Nyaya Sanhita. Read it and understand it before signing.
Fill in the form ↑Field 17 — स्थान (Place): Write the city or village where you are filling the form — e.g., "लखनऊ" or your village name.
Fill in the form ↑Field 18 — दिनांक (Date): Write the current date in DD/MM/YYYY format. The date should be the same day or within 1–2 days of your eSathi application submission.
Fill in the form ↑Field 19 — मोबाईल न. (Mobile Number): Write your 10-digit mobile number — the same one registered with your Aadhaar and eSathi account.
Fill in the form ↑Field 20 — हस्ताक्षर (Signature): Sign with a dark pen — black or dark blue ink. This is the most important field on the entire form. An unsigned form is automatically rejected regardless of how perfectly everything else is filled. The signature does not need to match any other document — it is your personal attestation mark.
Fill in the form ↑How to Scan and Upload Correctly
This step causes more rejections than the form itself. The eSathi portal has specific format and size requirements that most applicants discover only after their upload fails or their application gets rejected.
Scanning — Step by Step
Print the form on clean white A4 paper after filling (or print from the interactive form above). Use a scanner set to black and white mode at 200 DPI resolution — this produces a clear image at a manageable file size. If you don't have a scanner, use a phone scanning app (Adobe Scan, CamScanner, or Google Drive's built-in scan). Place the form on a flat surface under even lighting and hold the phone directly above, not at an angle. The app will auto-crop and enhance contrast.
Save the scan as JPEG — not PDF. The eSathi portal's upload slot for the self-declaration form specifically requires JPEG format. Many applicants scan as PDF (the default on most scanners) and wonder why the upload fails or the application gets flagged. If your scanner only produces PDF, convert to JPEG using any free online tool — search "PDF to JPEG converter."
Compression and Upload
The maximum file size is 100KB. A full-colour A4 scan at 300 DPI easily exceeds 500KB. Black and white at 200 DPI typically produces 80–150KB — close to the limit. If your file exceeds 100KB, compress it using a free online JPEG compressor (search "compress JPEG to 100KB"). After compression, open the file and zoom into the text — if any field is unreadable, the verifying officer will reject it. Re-scan at slightly higher quality and compress again if needed.
Upload the JPEG on the eSathi portal in the "स्वप्रमाणित घोषणा पत्र" slot when filling your certificate application. The upload button accepts one file — your scanned, signed, JPEG self-declaration form under 100KB. Double-check that the uploaded file is the signed version, not the blank form.
7 Mistakes That Cause Rejection — And How to Avoid Each
- 1. Form uploaded without signature. The most common and most avoidable mistake. Everything is filled, scanned, and uploaded perfectly — except the signature field is empty. Before uploading, zoom into the scan and verify that your signature is clearly visible at the bottom of the form.
- 2. JPEG required but PDF uploaded. The eSathi upload slot for this specific document expects a JPEG image file. A PDF may cause a silent upload failure or get flagged during processing. After scanning, check the file extension — it should end in .jpg or .jpeg, not .pdf.
- 3. File exceeds 100KB. The portal enforces this limit strictly. A colour scan or a high-resolution scan from a DSLR camera easily crosses it. Scan in black and white at 200 DPI, and compress the JPEG if it still exceeds the limit.
- 4. Name on the form doesn't match Aadhaar. Your name on the self-declaration, your Aadhaar card, and your eSathi application form must be identical — same spelling, same middle name, same language. Three different versions of your name across three documents is the second most common rejection trigger after missing signatures.
- 5. Caste name spelling doesn't match official list. For caste certificate applications, the caste name you write in Field 9 must exactly match the spelling in the Presidential Order (SC/ST) or official UP state OBC notification. Even one character of variation — like writing "चर्मकार" when the official list says "चमार" — causes rejection. Verify the exact spelling at ncbc.nic.in (central list) or the relevant UP government notification (state list) before filling.
- 6. Annual income field left blank or filled inconsistently. For income certificates, the income figure on the self-declaration must match what you enter in the eSathi application form. A mismatch between the two — ₹2,40,000 on the form but ₹2,50,000 on eSathi — creates a discrepancy that the Lekhpal will flag during verification.
- 7. Blurry or partially cut scan. You photographed the form instead of scanning it, or held the phone at an angle, or the edges of the form got cut off. The verifying officer cannot read one or more fields and rejects the application. Use a scanner or a scanning app that auto-crops to the page edges, and verify readability after compression.
Using the Form for Each Certificate Type
The same form covers all three certificates, but what you emphasise in each field differs based on which certificate you are applying for.
For Income Certificate
The most critical field is Field 15 (Annual Income). Declare the total combined income of all earning members in your household — salary, pension, rent, agricultural income, business profits, interest, and any other source. Do not understate it — the Lekhpal will assess your income through field verification, and a significant gap between your declaration and the Lekhpal's assessment leads to rejection. For salaried individuals, the figure should match your salary slip. For farmers, the Lekhpal checks land records (Khatauni from upbhulekh.gov.in) and consults the Gram Pradhan.
For Caste Certificate
The most critical field is Field 9 (Caste). Write the exact official spelling from the government gazette or Presidential Order. If a family member already has a caste certificate, check what spelling was used on that document and match it. Also fill Field 10 (Sub-Caste) if your sub-caste is relevant — for OBC applications, the sub-caste sometimes determines whether you fall under the central list or only the state list.
For Domicile Certificate
The most critical fields are Fields 8 (Place of Birth), 11 (Residence Address), 12 (Police Station), 13 (Tehsil), and 14 (District). All location fields must be consistent with each other, with your Aadhaar address, and with the address entered in your eSathi application. The Lekhpal will visit the stated address — if your address details don't lead to a real, findable location, verification fails.
Can You Fill the Form Digitally Instead of by Hand?
The standard practice is printing the blank form and filling it by hand with a pen. However, some applicants type their details into the PDF using a PDF editor (Adobe Acrobat, Foxit, or free tools like PDFescape), then print the typed version and sign by hand. Both approaches are accepted — the critical requirement is that the final signature must be handwritten on the physical printout, which is then scanned and uploaded as JPEG.
The interactive form on this page (above) offers a third approach: fill your details on screen, click Print, sign the printout, scan, and upload. This eliminates handwriting legibility issues and ensures all fields are complete before printing.
Whichever method you use, the uploaded file must be a scanned JPEG of the physically signed form — not a digitally signed PDF, not a screenshot, and not a photo of the form on your screen.
Frequently Asked Questions
Where can I download the official self declaration form for eDistrict UP?
The official form is available as a PDF on the eDistrict UP portal at edistrict.up.gov.in — look for "स्वप्रमाणित घोषणा पत्र" in the downloads or quick links section. You can also download it directly from the button at the top of this page, which hosts the same official form for faster and more reliable access.
#Do I need stamp paper or a notary to use this form?
No. The self declaration form fully replaced notarized affidavits on stamp paper for eDistrict UP certificate applications. There is no cost to fill or submit this form — it is a free PDF download that you print, fill, sign, and upload yourself.
#Can one form be used for income, caste, and domicile certificates?
Yes. The same form works for all three. In the "Purpose" field at the top, write whichever certificate type you are applying for. If you are submitting multiple certificate applications at the same time, you can mention all types on one form or fill a separate copy for each — both approaches are accepted.
#What happens if I write incorrect information on the form?
The declaration text on the form explicitly warns that false statements make you liable under IPC Sections 199 and 200 — now Sections 236 and 237 of the Bharatiya Nyaya Sanhita. Both are punished as if you had given false evidence, which carries up to seven years' imprisonment. The certificate will also be cancelled if issued based on false information, which can affect your scholarship, job application, or any benefit that depended on it.
#My application was rejected because of the self-declaration form. What might have gone wrong?
The most common rejection causes are: the form was uploaded without a signature, the file was in PDF format instead of JPEG, the file exceeded the 100KB size limit, the scan was too blurry to read, or your name on the form didn't match your Aadhaar card and eSathi application. Identify the specific issue from your rejection note in the eSathi dashboard, fix it, and reapply.
#Can I fill the form in English instead of Hindi?
The official form from the portal is in Hindi. However, you can write your details in English in the Hindi form fields — the system accepts both languages. The key requirement is that all details must match your Aadhaar card and eSathi application exactly, regardless of language.
#Is the self-declaration form the same as a self-attested document?
They are related but different. Self-attestation means signing a photocopy of your document to certify it is a true copy — replacing attestation by a gazetted officer. The self-declaration form is a separate document where you declare specific facts (income, caste, address) are true. Both were introduced under the same DARPG reform initiative in 2014, but they serve different purposes.
#A CSC operator is charging ₹50–100 to fill this form for me. Is that correct?
The form itself is completely free — it is a PDF download that costs nothing. CSC operators who charge for filling the form are charging for their time and effort in helping you complete it, which some operators include in their facilitation fee. If you can fill the form yourself (or use the interactive form on this page), you save that money entirely.
#What if I forgot to write my annual income on the form for an income certificate application?
The income field is critical for income certificate applications. If you left it blank and your application was not yet rejected, you cannot edit the uploaded form. If it gets returned for correction, fill a new form with the income field completed, scan it, and re-upload. If it gets rejected outright, fill a new form correctly and submit a fresh application.
#Does the signature need to match my Aadhaar or any other document?
No. The signature on the self-declaration form is simply your personal attestation mark. It does not need to match any other signature on file. However, it must be your genuine handwritten signature — not a typed name, a stamp, a thumb impression (unless specifically instructed for applicants who cannot sign), or a digital signature.
#No matching questions.
Quick Reference Table
| Detail | Information |
|---|---|
| Form name (Hindi) | स्व-प्रमाणित घोषणा पत्र (Swa Pramanit Ghoshna Patra) |
| Also called | घोषणा पत्र, self declaration form, self-attested declaration |
| Required for | Income, Caste, Domicile certificates on eDistrict UP |
| Replaced | Notarized affidavits on ₹10–100 stamp paper |
| Cost of form | Free |
| Total fields | 20 (including pre-printed declaration text) |
| Upload format | JPEG only (not PDF) |
| Maximum file size | 100KB |
| Scan settings | Black & white, 200 DPI |
| Signature | Handwritten — mandatory |
| Legal reference | BNS Sections 236-237, formerly IPC 199-200 (false declaration, and using a false declaration) |
| Penalty for false info | 6 months to 7 years imprisonment |
| Reform source | DARPG guidelines 2014, DoPT letter to ministries |
| Annual affidavit cost saved | ₹8,000 crore nationally (source: Centre for Civil Society, cited by DoPT) |
| Punjab model result | Affidavit requests dropped from 65% to 9.8% of all services |